Contents
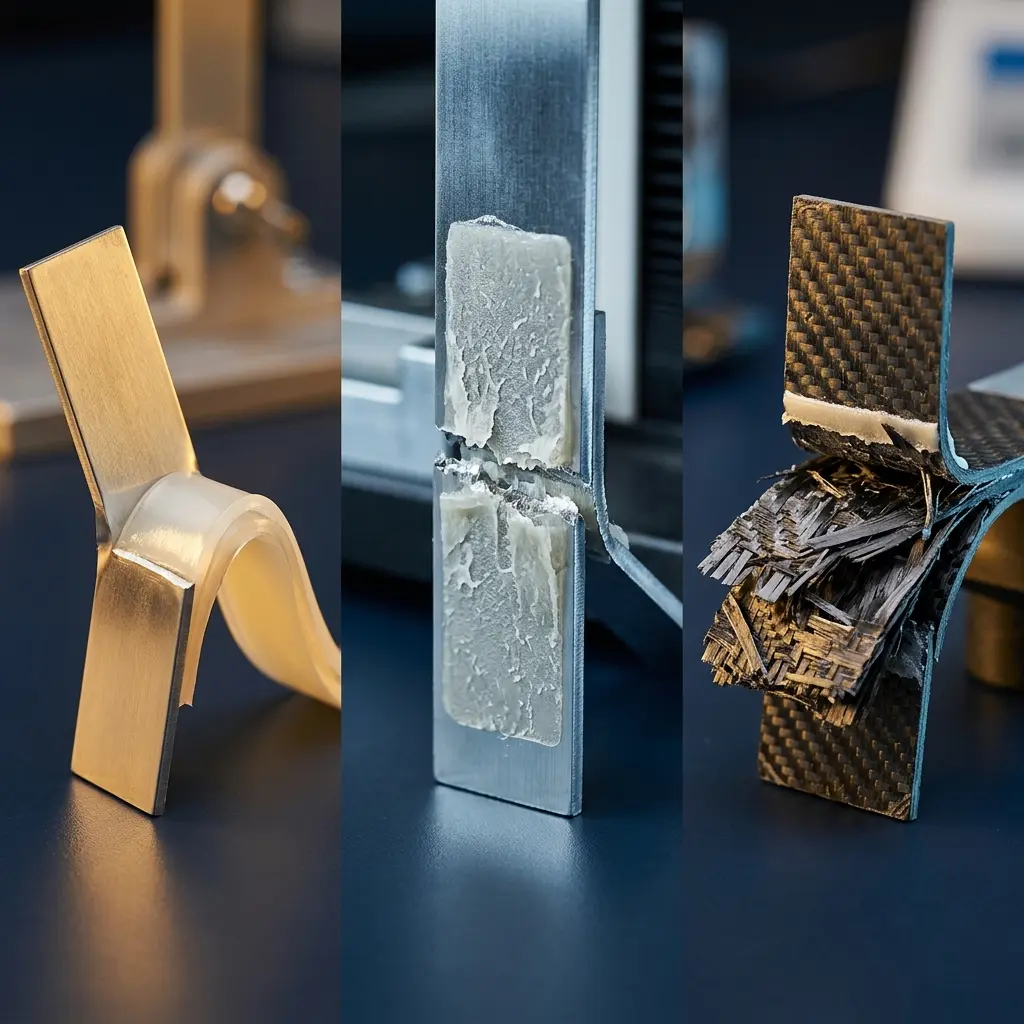
Bonding and Adhesion Reliability

Prevent Adhesive Bond Failure Before Bonding: Common Causes, Failure Mode Clues, and Troubleshooting

Stop adhesive failure before it reaches assembly by screening substrate wetting, surface preparation quality, and process drift before the adhesive bond is made.

Who this is for: Process engineers, QA/QC teams, manufacturing leads, and technical managers responsible for adhesive bond quality, rework reduction, and bond failure troubleshooting.

Positioning: Dropometer does not replace final bond-strength verification such as peel, lap shear, pull-off, or finished-part acceptance testing. It adds a fast upstream screen based on sessile-drop contact angle and optional surface energy trend data, helping teams detect poor wetting, contamination, low-surface-energy substrate risk, and process inconsistency before the bonding process moves forward.

Last updated
February 27, 2026

Evidence Box (QC-Ready)

Problem this solves

Adhesive failure that appears after bonding, cure, or assembly when the real issue started earlier: contamination, inconsistent surface preparation, low-energy substrate behavior, or uncontrolled time-to-bond.

Dropometer role in workflow

A fast quantitative screen before bonding and a practical troubleshooting tool when adhesive bond quality starts drifting.

Primary outputs

- Water contact angle at a fixed time for wetting readiness
- Replicate spread across spots or zones to detect non-uniformity
- Optional surface energy trend analysis using supported models when greater discrimination is needed between substrate-related wetting limits and contamination-related changes

Calibration requirement

Build PASS / MONITOR / FAIL gates by correlating measured wetting signals to your actual acceptance outcomes for each substrate family, coating type, and prep route.

Protocol defaults

- Probe liquid: DI water for the primary screen
- Droplet volume: choose one volume and lock it
- Capture time: fixed reporting timepoint
- Replicates: at least 5 spots per material zone
- Re-run rule: repeat any test with unstable baseline, distorted droplet edge, or visible debris

Known limitations

- Contact angle is a process-risk indicator, not direct proof that a durable bond will occur. Always correlate to your acceptance test.
- Rough, porous, or highly textured substrate surfaces may increase scatter.
- Cure drift, adhesive chemistry mismatch, and adhesive application errors still need separate process control.

How this page was created 4 checklist items
01

Transparency Note

Drafting assistance: Initial draft created with AI assistance (ChatGPT 5.2 Pro), then rewritten for technical clarity.

02

Transparency Note

Technical review: Reviewed and edited for technical accuracy by a surface-science specialist.

03

Transparency Note

Verification steps: Identifiers, units, thresholds, and key claims checked against cited sources before publication.

04

Transparency Note

Updates: Reviewed every 12 months or when the underlying standard changes.

Why Adhesive Bond Failure Starts Before the Adhesive Is Applied

Add pre-bond surface and cure gates before late-stage failures occur

Adhesive failure often gets discovered too late, after scrap, rework, downtime, or customer complaints have already started. In many lines, the adhesive fails not because the type of adhesive is automatically wrong, but because the substrate surface is not truly ready for bonding. Common causes include contaminants such as oils, release agents, dust, oxidation, poor surface preparation, coating variation, or too much delay between treatment and bonding.

This use case adds a practical upstream gate. First, measure wetting readiness on the substrate before the adhesive is applied. Second, use the same measurement logic for adhesive failure troubleshooting when performance begins to drift. The goal is not to predict bond strength from one number. The goal is to reduce false passes, identify the root cause faster, and prevent adhesive bond problems from moving deeper into production.

What Does Adhesive Bond Failure Actually Look Like on the Line?

Adhesive bond failure is often treated as a late-stage assembly issue, even though the root cause usually starts earlier. A substrate may look visually clean yet still show poor adhesion because of low surface energy, inconsistent surface preparation, contamination, oxidation, or handling damage. In other cases, the adhesive system is fine, but cure timing, humidity, temperature, or adhesive coverage drift turns a reliable bond into an intermittent failure.

  • “Glue not adhering” on some lots but not others
  • Delamination or edge lift after cure
  • Bond failure that appears random across shifts, operators, or lines.
  • An adhesive bond that passes one day and fails the next with the same nominal material
  • More debates than data during troubleshooting
  • Rework caused by substrate variability, not obvious material selection errors

Why Does Adhesive Bond Failure Happen? Root Causes You Can Test Before Assembly

Why:

Contaminants such as oils, release agents, dust, oxidation products, packaging residue, fingerprints, or cleaning residue can prevent the adhesive from wetting the substrate surface uniformly. Even a strong adhesive may not adhere correctly if the interface is compromised.

How to detect:

  • Contact angle rises above your known-good baseline
  • Replicate spread increases across spots
  • Edge, lane, or operator-contact patterns emerge
  • Re-cleaning one sample improves wetting significantly

Corrective action:

  • Standardize cleaning chemistry, dwell, rinse, and dry steps
  • Add no-touch handling rules
  • Re-check surfaces immediately after cleaning or activation
  • Use a clean control coupon on every shift

Why:

Some polymers, coatings, and treated surfaces naturally resist wetting. On these materials, a correct adhesive may still struggle unless the surface preparation route, activation method, or time-to-bond is tightly controlled.

How to detect:

  • Contact angle remains high even after cleaning
  • Improvement after cleaning is minor
  • Surface energy trend remains low or inconsistent across similar substrate lots

Corrective action:

  • Add or optimize plasma, corona, flame, or primer steps
  • Tighten the delay between treatment and adhesive application
  • Recheck whether the correct adhesive and the correct surface route were selected for the specific application

Why:

Sometimes wetting is acceptable, but failure occurs when the adhesive becomes too viscous, the open time is exceeded, UV or thermal cure is incomplete, the bond line changes, or environmental conditions shift. In these cases, the substrate is not the only variable.

How to detect:

  • Wetting looks normal but the adhesive fails in use
  • Failures correlate with operator timing, temperature, humidity, or UV light dose
  • Cure logs are missing, incomplete, or inconsistent
  • Adhesive flow or viscosity changes are visible in production

Corrective action:

  • Lock the time between surface preparation, dispense, assembly, and cure
  • Separate safe-to-handle from full-cure release criteria
  • Audit adhesive application, mix ratio, and bond-line control
  • Confirm the type of adhesive is still appropriate under actual line conditions

How to Test Surface Readiness Before Bonding: What to Measure and How to Interpret It

Water contact angle at fixed time

Why it matters: This is the fastest screen for whether a substrate is ready for adhesive wetting.

How to interpret: Lower angle usually means easier wetting. Rising angle versus baseline indicates higher risk. Compare median values, not one droplet

When it is not enough: Contact angle confirms wetting readiness, not bond strength. If contamination chemistry must be identified, FTIR-ATR, XPS, or ToF-SIMS is required.

Spot-to-spot variability

Why it matters: A single average can hide a localized issue. Variability is often what reveals intermittent adhesive failure.

How to interpret: Low variability suggests a stable surface. High variability suggests contamination, uneven treatment, or handling effects. Fixed-location checks can show whether the issue is at edges, lanes, or touch points

When it is not enough: High spread signals a non-uniform surface but does not identify whether the cause is contamination, uneven treatment, handling damage, or substrate texture. Use spatial testing to narrow the source.

Optional surface energy trend

Why it matters: Dropometer supports surface energy analysis using Equation of State, Fowkes, and van Oss-Good models, which can help distinguish a truly low-energy substrate from a contamination-driven wetting shift.

How to interpret: Surface energy values are model-dependent and most useful as comparative indicators between lots or treatments, not as absolute physical constants. Do not compare values calculated using different models.

When it is not enough: It is not chemical identification and should not replace root-cause confirmation methods when chemistry must be proven.

Cure readiness record

Why it matters: Even good wetting can still lead to bond failure if cure and handling controls are poor.

How to interpret: Missing or out-of-range logs mean process risk. Delays between prep and bonding can lead to bond failure. UV, thermal, or ambient cure rules must be held constant

When it is not enough: Logging cure parameters confirms the process ran within specification. It does not confirm the bond achieved rated mechanical strength, which requires destructive acceptance testing on finished parts.

How to Add a Pre-Bond Surface Screen to Your Quality Workflow

Dropometer is best used as a pre-bond QC screen and as a structured troubleshooting step after adhesive failure begins to trend. Dropometer supports sessile static, advancing, and receding contact-angle measurement, tilt measurement, and optional surface-energy workflows, which makes it suitable for screening wetting-related process drift before assembly.

1

Pre-screen the substrate

Immediately after cleaning, treatment, or incoming inspection:

- Place the sample on the instrument
- Run the fixed droplet method
- Record median contact angle across multiple spots
- Flag unusual spread before adhesive application starts

2

Release or hold

If the surface matches your baseline band, proceed. If wetting is drifting or variability is high, hold the lot before bonding.

3

Troubleshoot with structure

When failure occurs:

- Re-test known-good versus suspect substrate lots
- Compare treated versus untreated surfaces
- Compare early-shift and late-shift parts
- Check whether the issue follows the material, the operator, the prep route, or the cure step

Validated measurement approach

Independent benchmarking and publication-based validation references.

Benchmark Validation

Our Contact angle and pendant‑drop surface tension methods have been benchmarked against KRÜSS DSA100E reference measurements.

See peer‑reviewed validation

Publication Evidence

Our instruments are referenced in peer‑reviewed journals, theses, and conference publications

Browse the full citations list

How to Set Contact Angle Pass/Fail Gates for Your Bonding Process

Your goal is not to invent universal thresholds rather to create site-specific gates that are defensible.

Recommended calibration study

  • 10-20 representative samples spanning pass and fail outcomes
  • at least 2 operators (to prove repeatability)
  • include a "golden control" coupon measured every run

Outputs you should lock

  • droplet volume
  • capture time
  • probe fluid source + storage rules
  • replicate count + zones
  • summary stats (median + IQR)

QC-Ready Quick Protocol (SOP Card)

Goal: Prevent adhesive failure before bonding by screening substrate readiness and escalating only when needed.

Sample Handling

  • Use a clean fixture
  • Define no-touch areas
  • Record storage and time since surface preparation

Setup

  • Lock lighting and level
  • Use the same probe liquid and droplet volume every run
  • Include a known-good control

Measurement

  • Run a fixed-time contact-angle check
  • Test at least 5 spots per zone
  • Record median and spread
  • Re-run any visibly poor droplet

Release Rules

  • If roughness is high, increase replicates
  • If the adhesive may be affected by cure delay, record time-to-bond
  • If the substrate is polished, coated, or low-surface-energy, maintain a tighter baseline window

Adhesive Failure Troubleshooting Guide: Step-by-Step Triage

Start condition: Adhesive failure, delamination, or glue not adhering complaints are increasing.

A. Contact angle is high versus baseline

Likely signals: Contamination, poor surface preparation, low surface energy, or treatment loss

Action: Hold parts, re-clean or re-treat, then re-measure

B. Median looks acceptable but spread is high

Likely signals: Uneven prep, localized contaminant, or handling damage

Action: Test fixed locations, isolate source, correct handling or prep, then revalidate

C. Wetting looks normal but failure continues

Likely signals: Cure drift, adhesive application error, viscosity shift, or wrong process timing

Action: Audit cure, open time, UV exposure, adhesive coverage, and environmental conditions

What Changes When You Screen Surface Readiness Before Bonding

Before vs With Dropometer

Metric Before Dropometer With Dropometer Reported Outcome
Failure discovery point Post-assembly Pre-bond surface screen Rework initiated earlier in process
Troubleshooting cycle Multi-day, opinion-driven Same-shift, data-driven Faster root cause isolation
Operator-to-operator variation Unmeasured Tracked per run Process drift becomes visible
Audit documentation Subjective notes Numeric contact angle logs Defensible QC record

What Contact Angle Measurement Cannot Tell You About Adhesive Bond Quality

  • Do not claim one universal contact-angle threshold for every adhesive bond
  • Contact angle is a screening signal, not final proof of strength
  • Roughness, porosity, and textured coating surfaces can raise scatter
  • The right adhesive still matters; proper adhesive selection and material selection are separate decisions
  • A correct adhesive can still fail due to improper surface preparation
  • A strong adhesive does not overcome every contaminant or cure mistake

Use this page to improve prevention and troubleshooting, not to oversimplify adhesion science

Report a correction

Spotted an issue in this summary? Send a correction request and our team will review it.

Correction Request

We work hard to keep this standards summary accurate and up to date. If you spot an error (wrong revision/year, missing requirement, incorrect interpretation, or broken link), tell us and we'll review it.

Contact us to report a correction