Contents
Printing Wetting, Ink Adhesion and Film Performance

Ink Viscosity Troubleshooting for Print Quality: Control Ink Flow, Surface Tension and Thickness

Stop uneven ink flow, smudging, and poor print quality by separating ink viscosity, surface tension, and film wetting effects—then tuning thickness and drying with confidence instead of guesswork.

Who this is for: Process engineers, ink formulators, QA/QC teams, and production leads in flexographic, gravure, and coating workflows responsible for consistent print quality and ink adhesion on films.

Positioning: Dropometer does not replace press-side print tests. It adds quantitative wetting and surface tension data so your team can distinguish true ink viscosity problems from surface energy mismatches—leading to faster troubleshooting and fewer print defects.

Written by
Droplet Lab Technical Writing Team
Reviewed by
Surface Science Specialist (Print & Converting)
Last updated
2026-02-09
Written by
zoya
No biography added yet.
Read More
Written By

No biography added yet.

Evidence Box (QC-Ready)

Problem this solves

Inconsistent ink viscosity, uneven ink flow, smudging, poor coverage, and print quality defects caused by incorrect viscosity, surface tension imbalance, or substrate wetting failure.

Dropometer role in workflow

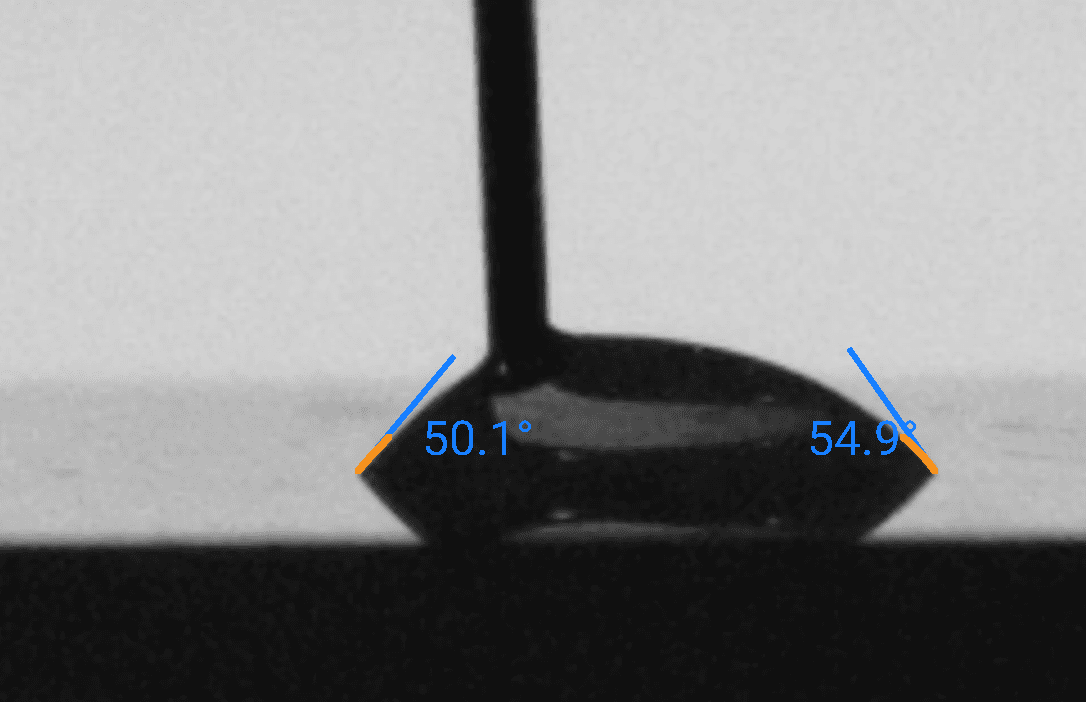
Provides contact angle (film wetting) and surface tension of the ink so you can isolate whether defects are caused by ink viscosity or wetting mismatch.

Primary outputs

Contact angle (10°–175°, 0.01° resolution)
Surface free energy trend (up to 100 mN/m)
Pendant-drop surface tension (up to 75 mN/m)

Calibration requirement

Define viscosity range, wetting thresholds, and print quality acceptance per ink type and substrate.

Protocol defaults (starting point)

Fixed droplet volume and capture time
≥5 replicates per zone
Stable temperature for ink viscosity measurement

Known limitations

Dropometer measures surface tension, not viscosity
Ink viscosity must be controlled using standard methods (efflux cup or rotational viscometer)
Wetting data indicates risk, not guaranteed adhesion

How this page was created 4 checklist items
01

Transparency Note

Drafting assistance: Initial draft created with AI assistance (ChatGPT 5.2 Pro), then rewritten for technical clarity.

02

Transparency Note

Technical review: Reviewed and edited for technical accuracy by a surface-science specialist.

03

Transparency Note

Verification steps: Identifiers, units, thresholds, and key claims checked against cited sources before publication.

04

Transparency Note

Updates: Reviewed every 12 months or when the underlying standard changes.

Executive Summary

Ink viscosity troubleshooting is often misdiagnosed. Teams frequently adjust viscosity when the real issue is surface tension and ink interaction with a low surface energy substrate.

Viscosity is a measure of fluid flow, but print quality depends on the relationship between viscosity, surface tension, and substrate wetting. If viscosity is too high, ink may not flow properly. If viscosity is too low, it may spread excessively, causing smudging or poor coverage.

This use case shows how to:

  • Control ink viscosity and thickness
  • Measure surface tension of the ink
  • Gate film wetting readiness

Result: consistent ink flow, improved adhesion, and optimal print quality with fewer defects and less trial-and-error troubleshooting.

Ink Viscosity & Print Quality Issues

<p data-start="3136" data-end="3326">In many printing processes, especially <strong data-start="3175" data-end="3203">flexographic and gravure</strong>, inconsistent ink viscosity leads to unstable print quality. However, <strong data-start="3274" data-end="3323">viscosity alone does not explain most defects</strong>.</p> <p data-start="3328" data-end="3371">The real issue is often a combination of:</p> <ul data-start="3372" data-end="3503"> <li data-section-id="25pgwa" data-start="3372" data-end="3399">Incorrect ink viscosity</li> <li data-section-id="1ydy97y" data-start="3400" data-end="3440">Poor surface tension and ink wetting</li> <li data-section-id="1vpgh3x" data-start="3441" data-end="3476">Uneven substrate surface energy</li> <li data-section-id="1a3d0ho" data-start="3477" data-end="3503">Improper ink thickness</li> </ul>

  • Uneven ink flow or inconsistent ink
  • Smudge, poor coverage, or streaking
  • Ink bead formation or crawling
  • Inconsistent print quality across rolls
  • Drying times that vary unexpectedly
  • Over-adjustment cycles (thicken → thin → adjust solvent)

Why It Happens

Why:

  • High-viscosity ink resists flow and transfer

How to detect:

  • Ink does not spread; poor coverage; larger dots

Corrective action:

  • Reduce viscosity using controlled solvent addition

Why:

  • Low-viscosity ink spreads excessively

How to detect:

  • Smudging, feathering, uneven flow

Corrective action:

  • Increase viscosity or adjust formulation

Why:

  • Ink cannot wet the substrate

How to detect:

  • Ink bead formation even at correct viscosity

Corrective action:

  • Adjust surfactant system or solvent balance

Why:

  • Ink does not adhere or spread

How to detect:

  • High contact angle values

Corrective action:

  • Treat substrate (corona/plasma)

Why:

  • Too thick → slow drying, defects; too thin → poor coverage

How to detect:

  • Variation in printed color and drying speed

Corrective action:

  • Control coat weight and application

What to Measure

Ink viscosity measurement

Why it matters: Controls ink flow and transfer

How to interpret: High viscosity → poor flow Low viscosity → excessive spreading

When it is not enough: Does not indicate wetting behavior

Surface tension and ink

Why it matters: Determines whether ink spreads or beads

How to interpret: Surface tension too high → poor wetting

When it is not enough: Must be paired with substrate data

Contact angle on substrate

Why it matters: Indicates surface readiness

How to interpret: High angle → low surface energy → poor adhesion

When it is not enough: Cannot detect viscosity issues

Ink thickness / coat weight

Why it matters: Affects drying times and print quality

How to interpret: Too thick → slow drying Too thin → weak color

How Dropometer Fits Your Workflow

1

Define print quality targets

Set acceptable thresholds for adhesion, appearance, and drying speed.

2

Build baseline for ink viscosity and surface tension

Measure known-good ink and substrate combinations.

3

Add two gates

  • Film wetting gate: Contact angle
  • Ink gate: Surface tension of the ink
4

Troubleshooting logic

  • If ink fails → adjust viscosity or formulation
  • If wetting fails → treat substrate
  • If both pass → adjust thickness and drying
5

Monitor drift

Track viscosity measurement and surface tension across shifts.

Validated measurement approach

Independent benchmarking and publication-based validation references.

Benchmark Validation

Our Contact angle and pendant‑drop surface tension methods have been benchmarked against KRÜSS DSA100E reference measurements.

See peer‑reviewed validation

Publication Evidence

Our instruments are referenced in peer‑reviewed journals, theses, and conference publications

Browse the full citations list

Baseline + gates (calibration first)

  • Acceptable viscosity range per ink type
  • Surface tension limits
  • Contact angle thresholds

Recommended calibration study

  • PASS: Ink and substrate within range
  • MONITOR: Trending toward limits
  • FAIL: Out of range → stop production

QC-Ready Quick Protocol (SOP Card)

Goal: Ensure consistent ink viscosity and print quality before production.

Sample Handling

  • Record ink storage, temperature, and batch
  • Maintain stable temperature conditions

Setup

  • Use standard viscosity measurement tools (efflux cup)
  • Ensure clean substrate

Measurement

  • Measure ink viscosity
  • Measure surface tension
  • Measure contact angle

Release Rules

  • Maintenance is essential for consistent performance
  • Helps you avoid defects before printing

Decision Tree (Triage)

Start condition: Print quality issue detected

Ink viscosity is too high

Action: Reduce viscosity

Ink viscosity is too low

Action: Increase viscosity

Surface tension too high

Action: Adjust formulation

Wetting failure

Action: Treat substrate

All OK

Action: Adjust thickness and drying

ROI Formula

Annual Savings = Reduced scrap + reduced downtime + improved efficiency

Instant ROI Snapshot

Calculate your savings in real time.

Result

≈0
hrs/month saved
≈$0
/month ROI

Where do these numbers come from? i You enter your current total time per test (dispense + record + analyze + save). The calculator assumes that our Dropometer reduces that workflow to ~1.1 minutes per test (dispense + capture + automated fit + export). Time saved per test = max(0, your time − 1.1 min). Monthly hours saved = (monthly tests × minutes saved per test) ÷ 60, and monthly savings = hours saved × labor rate.

Pitfalls + Limits

  • Ink viscosity doesn’t define print quality alone
  • Surface tension and ink must be evaluated together
  • High viscosity ≠ better performance
  • Low viscosity ≠ better flow in all cases
  • Always correlate to printed product performance

Report a correction

Spotted an issue in this summary? Send a correction request and our team will review it.

Correction Request

We work hard to keep this standards summary accurate and up to date. If you spot an error (wrong revision/year, missing requirement, incorrect interpretation, or broken link), tell us and we'll review it.

Contact us to report a correction