10 Essential Steps for Achieving Reproducible Contact Angle Measurements (2025)

Contact angle measurement is a cornerstone technique in surface science, providing insights into wettability, adhesion, and surface energy. However, achieving reproducible measurements is critical for meaningful interpretation and application.

Importance of Reproducibility

Reproducibility ensures reliability across dierent laboratories and experimental conditions. Challenges in reproducibility often arise from variations in surface preparation, droplet size, and environmental factors. Non-reproducible data can lead to incorrect conclusions about a material’s surface properties and undermine the credibility of the research.

Applications of Reproducible Contact Angle Measurements

Material Selection
Contact angle measurements guide material selection for applications requiring specic wettability characteristics, such as waterproof coatings or biomedical implants.
Surface Treatment Evaluation
Evaluate the eectiveness of surface treatments like plasma cleaning, chemical etching, or coating deposition by comparing pre- and post-treatment contact angles.
Adhesion Testing
Explore practical applications of superhydrophobic materials, particularly using a superhydrophobic aluminium mesh to observe and understand the behaviour of oil and water droplets, including the unique phenomenon of mixing these liquids on the coated surface.

Outline 10 essential steps to help you achieve reproducible contact angle measurements

To have an in-depth understanding of Contact-Angle measurements and their applications please refer to here. Here, we outline 10 essential steps to help you achieve reproducible contact angle measurements, incorporating ndings from literature and practical insights.
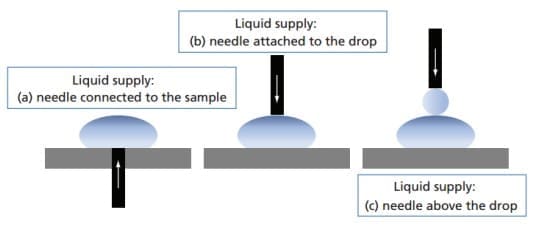
Step #1. Understand Contact Angle and its Types

Contact angle is the angle formed at the intersection of the liquid, solid, and vapor phases. It is determined by the balance of interfacial tensions and provides a quantitative measure of surface wettability. The most common methods include:
  • Sessile Drop Technique: A droplet is placed on a solid surface, and the contact angle is measured.
  • Dynamic Measurements: Advancing and receding angles are measured by adding or removing liquid from a droplet

Contact angles are classied into:

Static Contact Angle

Static Contact Angle

Static Contact Angle: Measured when the droplet is stationary. Static contact angle measurements are a starting point for surface characterization. They involve placing a liquid droplet on the surface and capturing its prole. However, these measurements can be inuenced by the droplet size, deposition method, and substrate preparation:
  • Droplet Size: Use droplets with diameters >5 mm to minimize edge eects and variability.
  • Deposition Method: Employ consistent techniques to ensure uniform droplet shapes and volumes.
Static Contact Angle

Advancing Contact Angle

Determined by slowly adding liquid to the droplet as the liquid front advances over a dry surface.
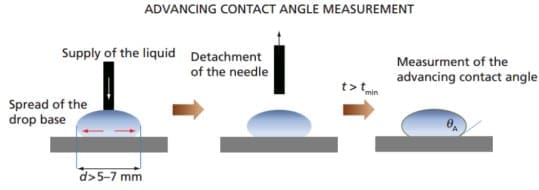
 

Advancing Contact Angle

Receding Contact Angle

Measured by gradually removing liquid as the liquid front recedes from a wetted surface.


Receding Contact Angle


Contact angle hysteresis, the dierence between advancing and receding angles, can indicate surface roughness or chemical heterogeneity.

Learn how you can perform Advancing and Receding contact Angle measurements:

https://www.youtube.com/watch?v=EMGdVc3Jf_g

Step #2. Prepare the Solid Surface Meticulously

Surface preparation signicantly aects contact angle reproducibility. Surface imperfections, such as roughness or chemical heterogeneity, can cause signicant contact angle hysteresis. Employ larger droplets to average out local variations. For rough surfaces, consider surface modication techniques to achieve smoother proles.

Follow these guidelines:

  • Cleaning: Use solvents, deionized water, or UV-ozone treatment to remove organic and inorganic contaminants. Ensure cleaning steps are consistent across samples. 
  • Polishing: Achieve a smooth surface with minimal roughness to reduce variability. Use techniques like ne grinding or polishing with diamond abrasives for metals, or specic cleaning agents for polymers.
  • Storage: Avoid contamination by storing surfaces in clean, dust-free environments. Samples should be measured immediately after preparation whenever possible.

Step #3. Ensure Environmental Stability

Environmental factors like temperature, humidity, and vibrations can signicantly impact measurements. Place the setup in an environment free from air currents, temperature uctuations, and contaminant exposure. A closed chamber or hood can provide additional isolation, especially for sensitive experiments.

Some best practices include:

  • Temperature: Maintain a stable ambient temperature to avoid uctuations in liquid properties.
  • Humidity: Keep relative humidity consistent to prevent changes in surface hydration.

Vibrations:- 

  • Vibrations can cause the contact line to move over energy barriers, impacting the advancing and receding contact angles. This can lead to reduced contact angle hysteresis under vibrational environments.
  • Even ambient vibrations can relax contact angles toward equilibrium, depending on the system’s metastable states.
  • Use vibration isolation tables to minimize disruptions during droplet deposition and analysis. Include link to a vibration isolation table?

Step #4. Calibrate Your Equipment

Accurate calibration ensures reliable data. Regular calibration of contact angle instruments is essential for accuracy. Calibration can be performed using standard reference materials with known contact angles. Advanced setups may also include self-check mechanisms to validate system performance. Regularly verify:

  • Syringe and needle cleanliness: Residues can alter droplet volume and shape.
  • Camera and optics alignment: Ensure sharp and distortion-free imaging.
  • Measurement software: Validate algorithms using known standards

Step #5. Choose the Right Liquid

Selecting a liquid with well-characterized properties enhances reproducibility:

  • Surface tension consistency: Verify the liquid’s surface tension before use.
  • Compatibility: Avoid reactions between the liquid and the substrate.
  • Examples: Common liquids include water, diiodomethane, and glycerol.

Step #6. Optimize Droplet Deposition

During droplet deposition, ensure smooth and controlled delivery to minimize oscillations or shape distortions. A syringe with a hydrophobic needle tip prevents liquid climbing on the needle surface, reducing inconsistencies.

Proper droplet size and placement are crucial:

  • Drop Size: Use droplets with diameters >5 mm to minimize edge eects and variability. Maintain diameters of 5-7 mm for better reproducibility.
  • Placement Technique: Employ consistent techniques to ensure uniform droplet shapes and volumes. Avoid distortion by depositing droplets slowly and carefully.

Step #7. Use Advanced Measurement Techniques

Manual measurements are prone to operator bias. If manual methods are used, thorough training and adherence to protocols are essential.

Modern contact angle instruments employ image analysis to calculate angles by tting the droplet prole to the Young-Laplace equation. This method reduces human error and enhances precision. Ensure software settings are optimized for droplet size, lens magnication, and lighting conditions. Automated systems with image analysis software can enhance accuracy and consistency.

Leverage modern tools for precision:

  • Sessile Drop Method: A standard approach using image analysis.
  • Dynamic Methods: Measure advancing and receding angles to assess hysteresis.
  • Surface Analyst Tools: Devices with automated image analysis minimize operator bias.

Step #8. Repeat Measurements for Reliability

Perform measurements at multiple points to account for surface variability:

  • Sampling Frequency: Test at least 3-5 locations on the substrate.
  • Statistical Analysis: Use averages and standard deviations to interpret results.

Gage Repeatability and Reproducibility (GR&R)

Conduct GR&R studies to evaluate the precision and reliability of both the measurement instrument and the operator. GR&R studies involve:

  • Multiple operators performing measurements on identical samples.
  • Repeated trials to assess intra-operator and inter-operator variability.
  • Statistical analysis to determine the percentage of variation attributable to equipment, operator, or sample.

Step #9. Document the Experimental Setup

Transparency in reporting enables reproducibility by others: Detailed Protocols: Include information on surface preparation, liquid properties, and environmental conditions. Example Workow
Step Description
1 Prepare substrate: Clean, polish, and store in a controlled environment.
2 Calibrate the instrument using a standard reference.
3 Deposit a droplet using a clean syringe and measure the static contact angle.
4 Add liquid to measure the advancing angle.
5 Remove liquid to measure the receding angle.
6 Repeat measurements at multiple locations on the sample for statistical validation.
Photographs or Diagrams: Show the experimental setup to eliminate ambiguity

Step #10. Account for Contact Angle Hysteresis

Contact angle hysteresis can provide insights into material properties:

  • Identify Causes: Hysteresis may result from surface roughness or contamination.
  • Quantify Eects: Use hysteresis measurements to infer surface heterogeneity.
Tools for Reproducible Contact Angle Measurements
Instrument

Sessile Drop Goniometer: High-precision imaging for contact angle analysis.

Surface Analyst: Automated systems for quick and consistent measurements.

Consider investing in Droplet Lab’s Smartphone-based Goniometer that oers precise drop generation using Hamilton Syringes in both manual and Automatic models. https://dropletlab.com/agship/

Software

Image Analysis Algorithms: Utilize software like Young-Laplace tting to analyze droplet proles accurately.


Droplet Lab’s Goniometer uses Young-Laplace equation and integrates Custom-Built machine learning model trained on 24,000+ images oers consistent, eortless measurements.

.

Accessories

Controlled Humidity Chambers: For ultra-precise measurements, advanced environmental chambers can control temperature, humidity, and atmospheric composition. These chambers are especially useful for sensitive materials prone to rapid oxidation or contamination.

High-Purity Liquids: Ensure consistency in droplet properties.

Advanced Considerations in Contact Angle Measurement

1. Macroscopic vs. Microscopic Contact Angles

Macroscopic Contact Angles: Dened as a boundary condition for stress equations governing liquid-vapor interfaces. They are essential for predicting the shapes of uid bodies and depend on precise measurement techniques.

Microscopic Contact Angles: Derived from molecular forces at the contact line and linked to interfacial tensions through the Young-Dupre equation.

2. Heterogeneous Surfaces
  • Natural surfaces often have spatial variations in surface chemistry and roughness, leading to distorted contact lines and contact angle hysteresis.
  • The interplay between surface heterogeneity and contact line distortion signicantly impacts the measurement process.
3. Length Scales Relevant to Contact Angles
  • The Decker paper explores how thermal and vibrational uctuations aect the contact line over microscopic and macroscopic scales.
  • Length scales near the contact line are critical for dening the YoungDupre force balance and understanding surface wettability barriers.
4. Metastability and Pinning Eects
  • Metastable states caused by surface defects pin the contact line, resulting in hysteresis.
  • The cooperative nature of pinning on heterogeneous surfaces creates complex contact line distortions that current theoretical models struggle to quantify.
5. Impact of Surface Heterogeneity on Measurement Techniques
  • Distorted liquid-vapor interfaces due to surface heterogeneity require sophisticated measurement techniques to ensure accurate contact angle readings.
  • Averaging macroscopic angles over heterogeneous surfaces often lacks a quantitative framework for understanding chemical and physical surface properties.

Conclusion

Reproducible contact angle measurements are essential for reliable surface characterization. Achieving reproducible contact angle measurements requires a combination of meticulous preparation, precise techniques, and advanced tools. By following these 10 steps, researchers and professionals can ensure reliable, accurate, and meaningful results, contributing to advancements in surface science and material characterization.

Leveraging advanced techniques such as image analysis and GR&R studies further enhances condence in results. With careful attention to detail, contact angle measurements can provide valuable insights into material properties, aiding in innovation across various industries.

For more insights and guides, visit our Surface Science Knowledge Hub.

References1. Drelich, J. (2013). Guidelines to measurements of reproducible contact angles using a sessile-drop technique. Surface Innovations, 1(SI4), 248-254. DOI: 10.1680/si.13.00010.
2. Brighton Science. (2022). Gage Repeatability and Reproducibility of the Surface Analyst. Available at: Brighton Science Website.
3. Decker, E. L., et al. (1999). Physics of contact angle measurement.  Colloids and Surfaces A: Physicochemical and Engineering Aspects, 156,
177-189. DOI: 10.1016/S0927-7757(99)00069-2.

Download Experiment